APIs such as OpenAI’s ChatGPT make it easier to build your own AI smart chatbot. In this tutorial, we will walk you through the process of constructing a working chatbot with PHP and the ChatGPT API.
Features
- User-Friendly UI: A clean and responsive design for seamless interaction.
- Typing Effect: Simulates typing for a realistic chat experience.
- Markdown Support: Properly renders rich-text responses from the AI.
Get a professionally designed and developed website tailored to your needs.
As an experienced website developer based in Delhi NCR, I offer customized solutions to build responsive, SEO-friendly, and user-friendly websites. Whether it’s for a personal blog, business site, or e-commerce store, I ensure your online presence stands out.
Before we start, ensure you have the following:
- A Web Server: Apache, Nginx, or any local development environment like XAMPP or WAMP.
- Composer Installed: To manage PHP dependencies.
- OpenAI API Key: Sign up at OpenAI to get your API key.
- Basic Knowledge: Familiarity with PHP, JavaScript, and HTML/CSS is assumed.
Build Your Own AI Smart Chatbot
Step-1: Generate OpenAI API Key
Once you’ve created an account and logged in, Create your project and navigate to the API section to generate an API key. This key will allow your PHP application to communicate with OpenAI’s servers.
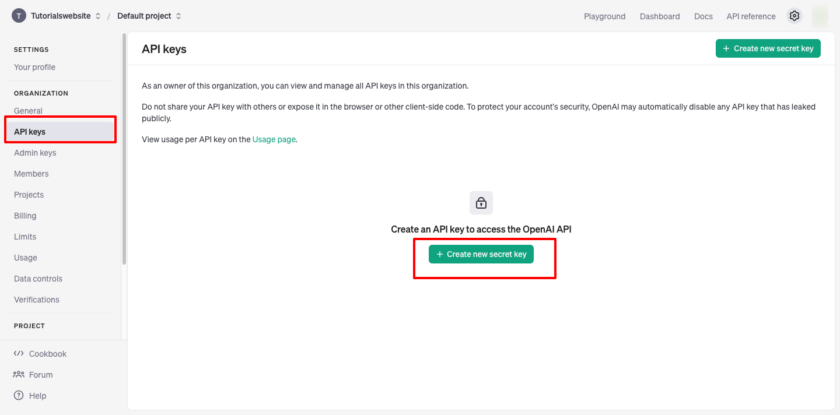
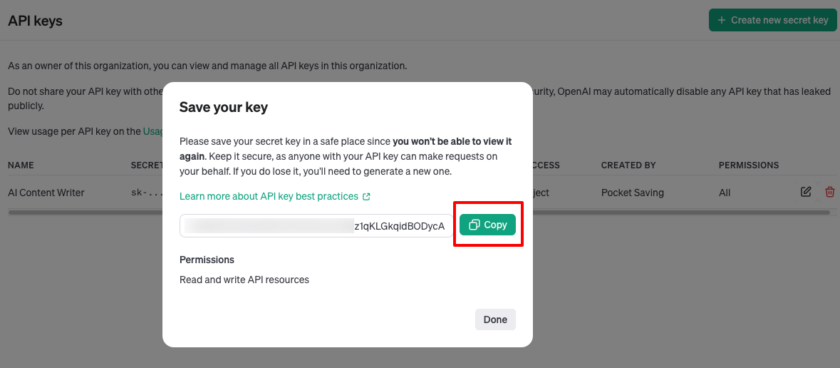
Now copy and save this key in a safe place for future use in the project.
Also Read: Create Your Own AI Content Writer in PHP with the ChatGPT API
Step 2: Setting Up the Project
1. Create a New Directory:
Name it “ai-chatbot“ or any preferred name.
2. Install Required Dependencies:
|
2 3 4 |
composer require erusev/parsedown |
This installs the Parsedown library for rendering Markdown responses from OpenAI.
3. Directory Structure:
|
2 3 4 5 6 7 |
ai-chatbot/ |-- index.php |-- openAI.php |-- vendor/ |
Step 3: Building the Frontend (index.php)
Copy and paste the complete code for index.php. This file provides the user interface:
|
2 3 4 5 6 7 8 9 10 11 12 13 14 15 16 17 18 19 20 21 22 23 24 25 26 27 28 29 30 31 32 33 34 35 36 37 38 39 40 41 42 43 44 45 46 47 48 49 50 51 52 53 54 55 56 57 58 59 60 61 62 63 64 65 66 67 68 69 70 71 72 73 74 75 76 77 78 79 80 81 82 83 84 85 86 87 88 89 90 91 92 93 94 95 96 97 98 99 100 101 102 103 104 105 106 107 108 109 110 111 112 113 114 115 116 117 118 119 120 121 122 123 124 125 126 127 128 129 130 131 132 133 134 135 136 137 138 139 140 141 142 143 144 145 146 147 148 149 150 151 152 153 154 155 156 157 158 159 160 161 162 163 164 165 166 167 168 169 170 171 172 173 174 175 176 177 178 179 180 181 182 183 184 185 186 187 188 189 190 191 192 193 194 195 196 197 198 199 200 201 202 203 204 205 206 207 208 209 210 211 212 213 214 215 216 217 218 219 220 221 222 223 224 225 226 227 228 229 230 231 232 233 234 235 236 237 238 239 240 241 242 243 244 245 246 247 248 249 250 251 252 253 254 255 256 257 258 259 260 261 262 263 264 265 266 267 268 269 270 271 272 273 274 275 276 277 278 |
<!DOCTYPE html> <html lang="en"> <head> <meta charset="UTF-8"> <meta name="viewport" content="width=device-width, initial-scale=1.0"> <title>Smart Chatbot</title> <style> body { font-family: 'Roboto', sans-serif; background: linear-gradient(to bottom, #6a11cb, #2575fc); display: flex; justify-content: center; align-items: center; height: 100vh; margin: 20px; color: #fff; } .heading { color: #333; text-align: center; padding: 15px; margin: 0px; background: #ededed; font-size: 25px; } .chat-container { width: 600px; max-height: 800px; background: #fff; border-radius: 20px; box-shadow: 0 10px 30px rgba(0, 0, 0, 0.2); display: flex; flex-direction: column; overflow: hidden; } #chat-output { flex-grow: 1; padding: 20px; overflow-y: scroll; background: #f9f9f9; scrollbar-width: thin; scrollbar-color: #007bff #ddd; display: flex; max-height:400px; flex-direction: column; } #chat-output::-webkit-scrollbar { width: 8px; } #chat-output::-webkit-scrollbar-thumb { background: #007bff; border-radius: 10px; } #chat-output::-webkit-scrollbar-track { background: #ddd; } .message { margin-bottom: 15px; display: flex; align-items: center; word-wrap: break-word; max-width: 80%; line-height: 25px; } /* Align user messages to the right */ .user-message { align-self: flex-end; background: linear-gradient(135deg, #6a11cb, #2575fc); color: #fff; padding: 10px 15px; border-radius: 20px 20px 0 20px; box-shadow: 0 3px 6px rgba(0, 0, 0, 0.1); } /* Align bot messages to the left with icon */ .bot-message { align-self: flex-start; background: #f1f1f1; color: #333; padding: 10px 15px; border-radius: 20px 20px 20px 0; box-shadow: 0 3px 6px rgba(0, 0, 0, 0.1); display: inline-block; align-items: center; } .bot-message .bot-icon { width: 30px; height: 30px; margin-right: 10px; background: #007bff; border-radius: 50%; display: flex; justify-content: center; align-items: center; color: white; font-weight: bold; font-size: 16px; box-shadow: 0 2px 5px rgba(0, 0, 0, 0.2); } .input-container { display: flex; padding: 15px; background: #fff; border-top: 1px solid #eee; box-shadow: 0 -2px 5px rgba(0, 0, 0, 0.1); } .input-container input { flex-grow: 1; padding: 10px 15px; border: 1px solid #ddd; border-radius: 30px; font-size: 14px; outline: none; transition: border-color 0.3s ease; } .input-container input:focus { border-color: #007bff; } .input-container button { padding: 10px 20px; margin-left: 10px; background: linear-gradient(135deg, #6a11cb, #2575fc); border: none; border-radius: 30px; color: white; font-size: 14px; cursor: pointer; transition: background 0.3s ease, transform 0.2s ease; } .input-container button:hover { background: linear-gradient(135deg, #2575fc, #6a11cb); transform: scale(1.05); } .typing-dots { display: inline-block; width: 8px; height: 8px; margin: 0 3px; border-radius: 50%; background: #888; animation: typing 1.2s infinite ease-in-out; } .typing-dots:nth-child(2) { animation-delay: 0.2s; } .typing-dots:nth-child(3) { animation-delay: 0.4s; } @keyframes typing { 0%, 100% { opacity: 0.2; transform: scale(1); } 50% { opacity: 1; transform: scale(1.2); } } </style> </head> <body> <div class="chat-container" id="chatbox"> <h4 class="heading">AI Smart Chatbot</h4> <div id="chat-output"> <!-- Messages will be displayed here --> </div> <form id="chat-form" method="POST" action=""> <div class="input-container"> <input type="text" id="message" name="message" placeholder="Type your message..." required> <button type="submit">Send</button> </div> </form> </div> <script> // Ensure all elements are correctly selected const form = document.getElementById('chat-form'); // Form element const input = document.getElementById('message'); // Input field for user message const chatOutput = document.getElementById('chat-output'); // Container for messages form.addEventListener('submit', async (event) => { event.preventDefault(); const userMessage = input.value; if (!userMessage) { chatOutput.innerHTML += `<div class="bot-icon">🤖</div><div class="message bot-message"> Please type a message.</div>`; return; } // Display user message chatOutput.innerHTML += ` <div class="message user-message"><p>${userMessage}</p></div>`; // Show typing dots as if the bot is typing const typingIndicator = ` <div class="bot-icon">🤖</div><div class="message bot-message" id="typing-indicator"><span class="typing-dots"></span><span class="typing-dots"></span><span class="typing-dots"></span></div>`; chatOutput.innerHTML += typingIndicator; const formData = new FormData(form); input.value = ''; // Clear the input field try { const response = await fetch('openAI.php', { method: 'POST', body: formData, }); const typingElement = document.getElementById('typing-indicator'); if (typingElement) { typingElement.remove(); // Remove the typing indicator } if (!response.ok) { throw new Error('Error communicating with the server.'); } const data = await response.json(); if (data && data.response) { const botMessage = data.response; // Decode and parse the HTML content const tempElement = document.createElement('div'); tempElement.innerHTML = botMessage; const decodedHTML = tempElement.innerHTML; // Create a container for the bot's message const botMessageContainer = document.createElement('div'); botMessageContainer.classList.add('message', 'bot-message'); chatOutput.appendChild(botMessageContainer); // Simulate typing effect let index = 0; const typingInterval = setInterval(() => { if (index < decodedHTML.length) { // Append character by character botMessageContainer.innerHTML = decodedHTML.substring(0, index + 1); index++; } else { clearInterval(typingInterval); // Stop typing effect once complete } }, 50); // Adjust typing speed } else { chatOutput.innerHTML += `<div class="bot-icon">🤖</div><div class="message bot-message">Bot: Sorry, I couldn't process your message.</div>`; } } catch (error) { chatOutput.innerHTML += `<div class="bot-icon">🤖</div><div class="message bot-message">Bot: ${error.message}</div>`; } // Scroll to the latest message chatOutput.scrollTop = chatOutput.scrollHeight; }); </script> </body> </html> |
Step 4: Backend Logic (openAI.php)
We will use this file to handles communication with OpenAI’s API.
|
2 3 4 5 6 7 8 9 10 11 12 13 14 15 16 17 18 19 20 21 22 23 24 25 26 27 28 29 30 31 32 33 34 35 36 37 38 39 40 41 42 43 44 45 46 47 48 49 50 51 52 53 54 55 56 57 58 59 60 61 62 63 64 65 66 67 68 69 70 |
<?php require 'vendor/autoload.php'; // Set your OpenAI API key here $apiKey = "your-openai-api-key"; $Parsedown = new Parsedown(); // Function to get the response from OpenAI API function getChatbotResponse($message) { global $apiKey; // OpenAI API endpoint $url = 'https://api.openai.com/v1/chat/completions'; // Prepare the data for the request $data = [ 'model' => 'gpt-3.5-turbo', // Or use 'gpt-3.5-turbo' for GPT-3.5 'messages' => [ ['role' => 'system', 'content' => 'You are a helpful assistant.'], ['role' => 'user', 'content' => $message] ], 'temperature' => 0.9, 'max_tokens' => 150 ]; // Set up cURL for the request $ch = curl_init($url); curl_setopt($ch, CURLOPT_RETURNTRANSFER, true); curl_setopt($ch, CURLOPT_POST, true); curl_setopt($ch, CURLOPT_POSTFIELDS, json_encode($data)); curl_setopt($ch, CURLOPT_HTTPHEADER, [ 'Content-Type: application/json', 'Authorization: Bearer ' . $apiKey ]); // Execute the cURL request and get the response $response = curl_exec($ch); curl_close($ch); // Check if the response is empty or an error occurred if ($response === false) { return 'Error: Unable to get response from API.'; } // Decode and return the response $responseData = json_decode($response, true); if (isset($responseData['choices'][0]['message']['content'])) { return $responseData['choices'][0]['message']['content']; } return 'Error: No valid response from API.'; } // Check if the form is submitted if ($_SERVER['REQUEST_METHOD'] === 'POST') { $userMessage = $_POST['message'] ?? ''; if (!empty($userMessage)) { $botResponse = getChatbotResponse($userMessage); // Fetch response $parsedResponse = $Parsedown->text($botResponse); // Convert to Markdown echo json_encode(['response' => $parsedResponse]); // Send as JSON } else { echo json_encode(['response' => 'Error: No message provided.']); } exit; } ?> |
Note: Don’t forget to replace your OpenAI API Key and models in the above code.
Are you want to get implementation help, or modify or extend the functionality?
A Tutorialswebsite Expert can do it for you.
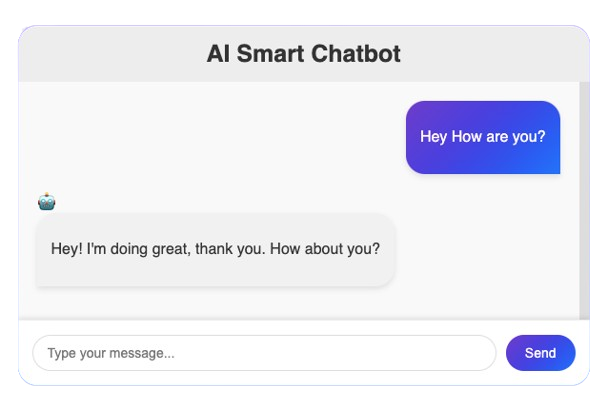
It’s done. Now, you can Access the URL of your project in your development environment, for example: http://localhost/ai-chatbot/.
if your code in on the live server then open https://yourdomain.com/ar-chatbot/
Concusion
Building an AI-powered smart chatbot using PHP and the OpenAI API opens up a world of possibilities for developing interactive and intelligent user experiences. You can create chatbots that comprehend and answer to user queries efficiently using PHP’s simplicity and OpenAI’s sophisticated natural language processing capabilities, delivering tailored solutions across a variety of applications.
Thanks for reading 🙏, I hope you found How to Create Your Own AI Chatbot in PHP with the ChatGPT API tutorial helpful for your project. Keep learning! If you face any problems – I am here to solve your problems.
FAQs
Yes, a basic understanding of PHP, HTML, JavaScript, and API integration is required.
Absolutely! While this article focuses on PHP, the ChatGPT API can be used with any language that supports making HTTP requests, such as Python, Java, Node.js, and more
The ChatGPT API has limits on request size (number of tokens), rate limits based on your subscription, and potential inaccuracies in its responses.
Yes! By modifying the system message in the API request, you can define the chatbot’s personality, tone, and knowledge base, tailoring it to your specific needs.
The provided example is a basic implementation. For production use, additional features like error handling, database integration, user authentication, and advanced response management should be added.

Pradeep Maurya is the Professional Web Developer & Designer and the Founder of “Tutorials website”. He lives in Delhi and loves to be a self-dependent person. As an owner, he is trying his best to improve this platform day by day. His passion, dedication and quick decision making ability to stand apart from others. He’s an avid blogger and writes on the publications like Dzone, e27.co


