Automation is growing more vital in the modern era of content creation. AI Content Writer is one of the most powerful content generation tools available today, with OpenAI’s ChatGPT standing out as a popular choice to generate human-like writing. AI may save you a lot of time while improving the quality of your blog posts, articles, and product descriptions.
In this tutorial, we’ll walk you through the steps of building your own AI content writer with PHP and the OpenAI ChatGPT API.
Get a professionally designed and developed website tailored to your needs.
As an experienced website developer based in Delhi NCR, I offer customized solutions to build responsive, SEO-friendly, and user-friendly websites. Whether it’s for a personal blog, business site, or e-commerce store, I ensure your online presence stands out.
What is ChatGPT?
ChatGPT built by openAI, is a strong language model that creates text that appears human and natural. It is trained on a large amount of data from many sources, allowing it to generate content on a wide range of themes, tones, and styles.
For example, if you require an article on a specific topic, you can simply tell ChatGPT, ‘Write a 500-word essay about AI in 2025,’ and it will generate content according to your specifications. This makes it a great tool for content creators who want to save time while improving their work.

Setting Up the OpenAI API
Before diving into the development, the first step is to set up the OpenAI API. Here’s how:
- Create an OpenAI Account: Go to OpenAI and create an account.
- Get Your API Key: Once you’ve created an account and logged in, Create your project and navigate to the API section to generate an API key. This key will allow your PHP application to communicate with OpenAI’s servers.
Generate API Key
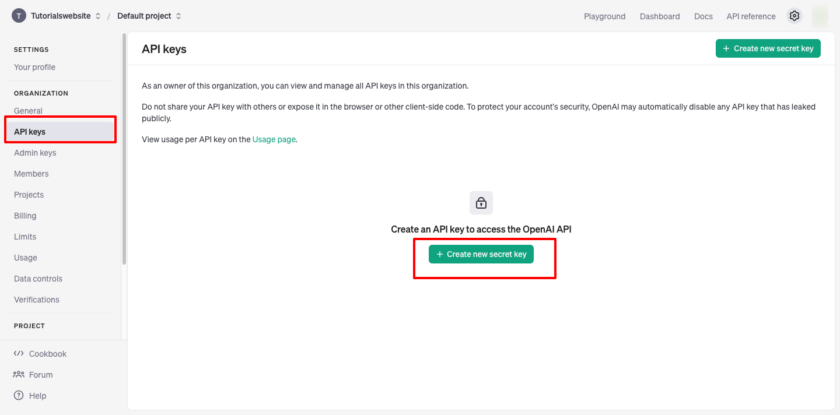
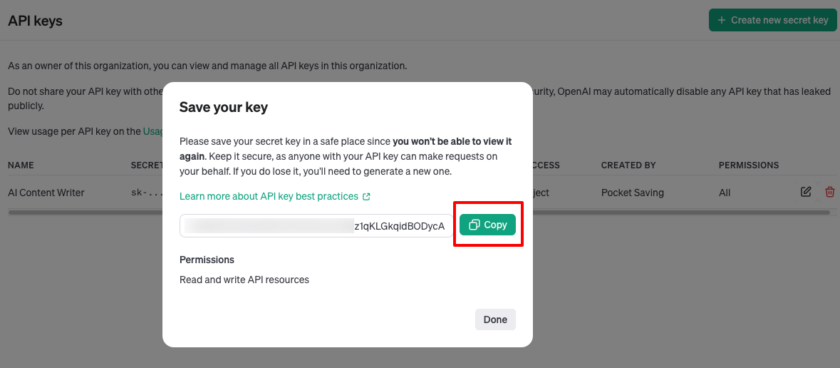
Now copy and save this key in a safe place for future use in the project.
Create a Frontend User Input Form
The first part of your application will be a simple HTML form where users can input the following details:
- Topic: The subject for which they need content.
- Tone: The tone of the article (formal, casual, etc.).
- Word Count: The desired length of the article.
Copy and Paste HTML code for the frontend:
PHP (index.php)
|
2 3 4 5 6 7 8 9 10 11 12 13 14 15 16 17 18 19 20 21 22 23 24 25 26 27 28 29 30 31 32 33 34 35 36 37 38 39 40 41 42 43 44 45 46 47 48 49 50 51 52 53 54 55 56 57 58 59 60 61 62 63 64 65 66 67 68 69 70 71 72 73 74 75 76 77 78 79 80 81 82 83 84 85 86 87 88 89 90 91 92 93 94 95 96 97 98 99 100 101 102 103 104 105 106 107 108 109 110 111 112 113 114 115 116 117 118 119 120 121 122 123 124 125 126 127 128 129 130 131 132 133 134 135 136 137 138 139 140 141 142 143 144 145 146 147 148 149 150 151 152 153 154 155 156 157 158 159 160 161 162 163 164 165 166 167 168 169 170 171 172 173 174 175 176 177 178 179 180 181 182 183 184 185 186 187 188 189 190 191 |
<!DOCTYPE html> <html lang="en"> <head> <meta charset="UTF-8"> <meta name="viewport" content="width=device-width, initial-scale=1.0"> <title>AI Content Writer | Tutorials Website</title> <style> body { font-family: 'Roboto', sans-serif; background: linear-gradient(to bottom, #6a11cb, #2575fc); display: flex; justify-content: center; align-items: center; height: 100vh; margin: 0; } .container { background: #ffffff; box-shadow: 0 4px 8px rgba(0, 0, 0, 0.1); border-radius: 8px; padding: 20px 30px; max-width: 60%; width: 100%; } h1.mainheading { text-align: center; color: #333; margin-bottom: 20px; } form { display: flex; flex-direction: column; } label { font-size: 14px; font-weight: bold; margin-bottom: 8px; color: #555; } input, select, button { font-size: 14px; padding: 10px; margin-bottom: 15px; border: 1px solid #ccc; border-radius: 4px; width: 100%; box-sizing: border-box; } input:focus, select:focus { border-color: #007bff; outline: none; } button { background-color: #007bff; color: white; border: none; cursor: pointer; font-weight: bold; transition: background-color 0.3s; } button:hover { background-color: #0056b3; } .content { margin-top: 20px; padding: 15px; background: #f9f9f9; border: 1px solid #ddd; border-radius: 4px; display:none; } .content h2 { color: #333; margin-bottom: 10px; } .content p { white-space: pre-wrap; /* Preserve line breaks */ font-size: 14px; color: #555; } #output pre{ position: relative; background: #111; color:#29d007; padding: 15px; border-radius: 5px; overflow-x: auto; /* Allows horizontal scrolling */ overflow-y: auto; /* Allows vertical scrolling */ max-height: 300px; /* Set a maximum height to trigger vertical scroll */ white-space: pre-wrap; word-wrap: break-word; font-size: 14px; line-height: 1.6; } </style> </head> <body> <div class="container"> <h1 class="mainheading">AI Content Writer</h1> <form id="contentForm"> <label for="topic">Topic:</label> <input type="text" id="topic" name="topic" placeholder="Enter the topic (e.g., AI in 2025)" required> <label for="tone">Tone:</label> <select id="tone" name="tone"> <option value="formal">Formal</option> <option value="casual">Casual</option> <option value="informative">Informative</option> </select> <label for="word_count">Word Count:</label> <input type="number" id="word_count" name="word_count" min="100" max="2000" placeholder="Enter word count (e.g., 500)" required> <button type="submit">Generate Content</button> </form> <div class="content" id="contentOutput"> <div id="output"></div> </div> </div> <script> document.getElementById('contentForm').addEventListener('submit', function (event) { event.preventDefault(); const formData = new FormData(event.target); const contentElement = document.getElementById('output'); document.getElementById('contentOutput').style.display="block"; contentElement.textContent = 'Generating...'; // Clear previous content // Use the Fetch API to send a POST request fetch('openAI.php', { method: 'POST', body: formData, }) .then(response => { if (response.ok) { // Create an EventSource to listen for real-time content const eventSource = new EventSource('openAI.php?' + new URLSearchParams({ topic: formData.get('topic'), tone: formData.get('tone'), word_count: formData.get('word_count') })); eventSource.onmessage = function (event) { if (event.data === '[DONE]') { eventSource.close(); } else { contentElement.textContent = ''; const content = JSON.parse(event.data); //const htmlContent = markdownToHtml(content); contentElement.innerHTML = content; // Append the cleaned content } }; eventSource.onerror = function () { //console.error('Error connecting to the server1.'); eventSource.close(); }; } }) .catch(error => { console.error('Error connecting to the server:', error); }); }); </script> </body> </html> |
Suggested Read: Best 20 ChatGPT Prompts for All Your Work Needs
Backend: PHP Script for OpenAI Integration
Run below command on terminal. Note: Composer should be installed on your local system.
|
2 3 4 |
composer require erusev/parsedown |
You will get vendor folder which we will use or include in the next code for html formatting.
Now that we have the frontend in place, let’s focus on the backend. The openAI.php script handles the interaction between your application and OpenAI’s API.
|
2 3 4 5 6 7 8 9 10 11 12 13 14 15 16 17 18 19 20 21 22 23 24 25 26 27 28 29 30 31 32 33 34 35 36 37 38 39 40 41 42 43 44 45 46 47 48 49 50 51 52 53 54 55 56 57 58 59 60 61 62 63 64 65 66 67 68 69 70 71 72 73 74 75 76 77 78 79 80 81 82 83 84 85 86 87 88 89 90 91 92 93 |
<?php require 'vendor/autoload.php'; //parsedown library included $apiKey = "YOUR_OPENAI_API_KEY"; $Parsedown = new Parsedown(); // Ensure the proper headers for SSE header("Content-Type: text/event-stream"); header("Cache-Control: no-cache"); header("Connection: keep-alive"); header("Access-Control-Allow-Origin: *"); header("Access-Control-Allow-Methods: POST, GET, OPTIONS"); header("Access-Control-Allow-Headers: Content-Type"); // Check if the request method is GET if ($_SERVER['REQUEST_METHOD'] === 'GET') { // Get the data from the form submission $topic = htmlspecialchars($_GET['topic'] ?? 'Default Topic'); $tone = htmlspecialchars($_GET['tone'] ?? 'neutral'); $wordCount = intval($_GET['word_count'] ?? 200); // Prepare the messages for OpenAI API request $messages = [ ['role' => 'system', 'content' => 'You are a professional content writer.'], ['role' => 'user', 'content' => "Write a {$tone} article about '{$topic}' in approximately {$wordCount} words."] ]; // Prepare the OpenAI API request payload $data = [ 'model' => 'gpt-4', // You can change to a different model if required 'messages' => $messages, 'max_tokens' => $wordCount * 4, 'temperature' => 0.7, 'stream' => true, // Enable streaming ]; // Initialize the cURL session $ch = curl_init('https://api.openai.com/v1/chat/completions'); curl_setopt($ch, CURLOPT_POST, true); curl_setopt($ch, CURLOPT_POSTFIELDS, json_encode($data)); curl_setopt($ch, CURLOPT_RETURNTRANSFER, false); curl_setopt($ch, CURLOPT_HTTPHEADER, [ 'Authorization: Bearer ' . $apiKey, 'Content-Type: application/json', ]); $content = ''; // Initialize an empty string to accumulate the content // Handle the stream of data curl_setopt($ch, CURLOPT_WRITEFUNCTION, function ($ch, $chunk) use (&$content, $Parsedown) { $lines = explode("\n", $chunk); foreach ($lines as $line) { $line = trim($line); if (empty($line) || strpos($line, 'data:') !== 0) continue; $data = json_decode(substr($line, 5), true); if (isset($data['choices'][0]['delta']['content'])) { $content .= $data['choices'][0]['delta']['content']; // Accumulate content // Once you have accumulated the content, convert it from Markdown to HTML $htmlContent = $Parsedown->text($content); // Convert to HTML // Output the converted HTML content echo "data: " . json_encode($htmlContent, JSON_UNESCAPED_SLASHES | JSON_UNESCAPED_UNICODE) . "\n\n"; ob_flush(); flush(); } } return strlen($chunk); }); // Execute the cURL request curl_exec($ch); // Close the cURL connection curl_close($ch); // Finalize the stream by sending a [DONE] message echo "event: close\n"; echo "data: [DONE]\n\n"; ob_flush(); flush(); exit; } ?> |
Are you want to get implementation help, or modify or extend the functionality?
A Tutorialswebsite Expert can do it for you.
Stream Data to Frontend in Real-Time
Here, I’m sending real-time AI-generated content to the user interface via the Server-Sent Events (SSE) method. This enables you to see the article in progress. SSE ensures that content is streamed piece by piece as the model generates it, providing a more seamless user experience.
Conclusion
Building an AI content writer using PHP and OpenAI’s ChatGPT API can save time while producing high-quality, human-like content. This AI tool is easy to integrate into any website or application thanks to its simple user interface, real-time streaming, and minimal backend code.
Also Read: Create Dynamic Image Slider Using PHP and MySQL
Whether you’re creating blogs, articles, or marketing copy, an AI content writer can help you improve your workflow and create more interesting material.
Thanks for reading 🙏, I hope you found How to Create Your Own AI Content Writer in PHP with the ChatGPT API tutorial helpful for your project. Keep learning! If you face any problems – I am here to solve your problems.

Pradeep Maurya is the Professional Web Developer & Designer and the Founder of “Tutorials website”. He lives in Delhi and loves to be a self-dependent person. As an owner, he is trying his best to improve this platform day by day. His passion, dedication and quick decision making ability to stand apart from others. He’s an avid blogger and writes on the publications like Dzone, e27.co



[…] Also Read: Create Your Own AI Content Writer in PHP with the ChatGPT API […]