Adding custom sections to your Shopify product pages can improve the purchasing experience by displaying personalized information like delivery details, product attributes, and much more. In this post, we’ll show you how to create a custom section for your product pages. This guide will assist you in displaying shipping icons, product highlights, or any other unique material without the requirement for third-party apps.
Suggested Read: How to Integrate PhonePe V2 Standard Checkout in PHP
Add Custom Section for Shipping Icons and Description on Shopify Product Pages
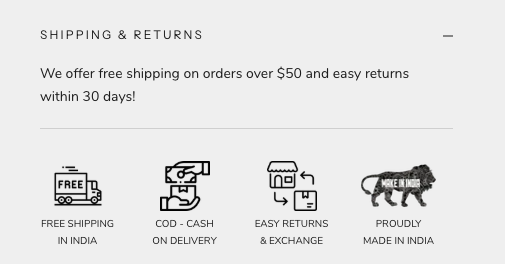
Adding a custom section for shipping icons and descriptions on your Shopify product pages can enhance the shopping experience for your customers by providing them with clear and visually engaging information.
Why Add a Custom Section for Shipping Icons and Description?
- Customer Trust: Shipping icons and clear descriptions help customers understand the delivery options, shipping timeframes, and return policies.
- Visual Appeal: Shipping icons provide a visual cue that makes it easy for customers to quickly identify important information.
- User Experience: A well-organized shipping description section can reduce customer concerns, leading to higher conversion rates.
Now, let’s dive into the process of adding this custom section.
Take your online store to the next level with a skilled Shopify expert.
Whether you’re starting from scratch or need improvements on your existing store, I provide custom solutions to optimize performance, enhance user experience, and boost sales. With in-depth knowledge of Shopify, I specialize in creating seamless, responsive, and user-friendly e-commerce websites.
Step 1: Create a New Section for Shipping Icons and Description
First, you need to create a new section that will be responsible for displaying your shipping icons and descriptions.
- From your Shopify Admin, go to Online Store > Themes
- In the Themes section, click on Actions and select Edit Code.
- In the Sections directory, click on Add a New Section.
- Name the section custom-
shipping.liquidand click Create Section.
Step 2: Add Code for Shipping Icons and Descriptions
let’s add the necessary code to display the shipping icons and descriptions.
Open your custom- file and paste the following code:shipping.liquid
|
2 3 4 5 6 7 8 9 10 11 12 13 14 15 16 17 18 19 20 21 22 23 24 25 26 27 28 29 30 31 32 33 34 35 36 37 38 39 40 41 42 43 44 45 46 47 48 49 50 51 52 53 54 55 56 57 58 59 60 61 62 63 64 |
<div class="shipping-description"> {% if section.settings.shipping_description %} <div class="shipping-text"> {{ section.settings.shipping_description | raw }} </div> {% endif %} </div> <div class="shipping-icons"> {% for block in section.blocks %} {% if block.type == 'shipping_icon' %} <div class="shipping-icon"> {% if block.settings.icon %} <img src="{{ block.settings.icon | image_url: width: 80 }}" alt="{{ block.settings.title }}"> {% endif %} {% if block.settings.title %} <h4>{{ block.settings.title }}</h4> {% endif %} </div> {% endif %} {% endfor %} </div> {% schema %} { "name": "Custom Shipping Section", "blocks": [ { "type": "shipping_icon", "name": "Shipping Icon", "settings": [ { "type": "image_picker", "id": "icon", "label": "Upload Icon" }, { "type": "text", "id": "title", "label": "Icon Title" } ] } ], "settings": [ { "type": "richtext", "id": "shipping_description", "label": "Shipping and Return Description", "default": "<p>We offer free shipping on orders over $50 and easy returns within 30 days!</p>" } ], "presets": [ { "name": "Shipping Icons Section" } ] } {% endschema %} |
In the above code:
- Schema Block: Defines the customizable options for the section, including the ability to upload icons, add titles, and provide descriptions for each shipping option.
- Shipping Description: Displays a rich-text description of your shipping and return policies at the top of the section.
- Shipping Icons: Loops through the blocks you’ve created, displaying icons, and title in a visually appealing layout.
Take your online store to the next level with a skilled Shopify expert.
Whether you’re starting from scratch or need improvements on your existing store, I provide custom solutions to optimize performance, enhance user experience, and boost sales. With in-depth knowledge of Shopify, I specialize in creating seamless, responsive, and user-friendly e-commerce websites.
Step 3: Style the Icons and Description with CSS
To make the icons and description section visually appealing, you’ll need to style them using CSS.
In your theme’s CSS file (often named theme.css or styles.css), add the following styles:
|
2 3 4 5 6 7 8 9 10 11 12 13 14 15 16 17 18 19 20 21 22 23 24 25 26 27 28 29 30 31 32 33 34 35 36 37 38 39 40 41 |
.shipping-description { text-align: center; margin-bottom: 2rem; } .shipping-description .shipping-text { font-size: 1.1rem; color: #333; margin-bottom: 1rem; } .shipping-icons { display: flex; justify-content: center; flex-wrap: wrap; gap: 2rem; } .shipping-icon { text-align: center; max-width: 200px; } .shipping-icon img { max-height: 60px; margin-bottom: 10px; } .shipping-icon h4 { font-size: 1.2rem; margin-bottom: 0.5rem; } .shipping-icon p { font-size: 1rem; color: #555; } |
Also Read: Integrate Cashfree Payment Gateway in PHP: A Step-by-Step Guide
Step 4: Add Custom Section to Your Product Pages
To display this custom section on your product pages, you need to insert it into the product.liquid file.
- In the Templates folder, find and open the
product.liquidfile (orproduct.jsonif using Shopify Online Store 2.0). - Locate the part of the file where you want to display the shipping information (usually beneath the product description).
- Add this line of code where you want the section to appear:
|
2 3 4 |
{% section 'custom-shipping' %} |
This above code will render the custom section you created, displaying the shipping icons and descriptions on the product pages.
Step 5: Customize the Section in Shopify Admin
Once you’ve added the section to your product pages, you can easily customize the content directly from the Shopify Admin:
- Go to Online Store > Themes.
- Click Customize on your active theme.
- Navigate to the Product Page.
- You will now see the Custom Shipping Section in the theme editor.
- Customize the section by uploading icons for each shipping method (e.g., Free Shipping, Cash on Delivery) and Easy Returns & Exchange.
Do you want to get implementation help, or modify or extend the functionality of this script? Submit a paid service request
Conclusion
By following these steps, you’ve created a custom section for your Shopify product pages where you can display icons, descriptions, or other personalized content. This feature enhances the user experience by presenting key information in a visually appealing and easy-to-read format.
Feel free to try out different types of content and change the styling to match your store’s branding. Custom sections are an effective way to differentiate your product pages and improve your customers’ shopping experiences.
Recommended Article: How to add Shopify Announcement bar (without an app)

Pradeep Maurya is the Professional Web Developer & Designer and the Founder of “Tutorials website”. He lives in Delhi and loves to be a self-dependent person. As an owner, he is trying his best to improve this platform day by day. His passion, dedication and quick decision making ability to stand apart from others. He’s an avid blogger and writes on the publications like Dzone, e27.co