By default, Laravel sends emails using the SwiftMailer library. SwiftMailer is the inbuilt library in Laravel. Mostly, we used the default mail() function to send emails in the PHP-based web application. Now, here we will try “PHPMailer” Laravel package for sending emails. PHPMailer is an open-source package and easy to set up and use in the laravel application. This package includes many features, like the ability to send multiple emails with To, CC, BCC, and Reply-to-addresses. It protects against header injection attacks in terms of security. That’s why, it is extremely safe to use. You can include attachments in your emails, including inline attachments.
I’ll show you how to Send Emails using PHPMailer in Laravel. Most of the developers always recommended using an SMTP server to send an email from a script in a web application. We already posted the article on the PHPMailer library to send email with an SMTP server using PHP.
Send Email using PHPMailer in Laravel
Here, for installing PHPMailer package in Laravel Application, I will be using the composer. You can use the Laravel installer too. Open the command prompt and hit the below command.
|
2 3 4 |
composer require phpmailer/phpmailer |
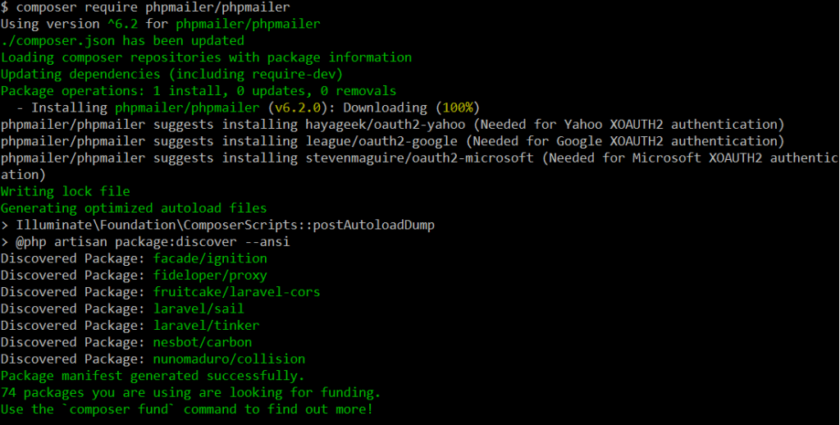
After installing the package, you can check the composer.json file to confirm that PHPMailer package installed or not. You will find composer.json file in the root of the project directory.
package.json
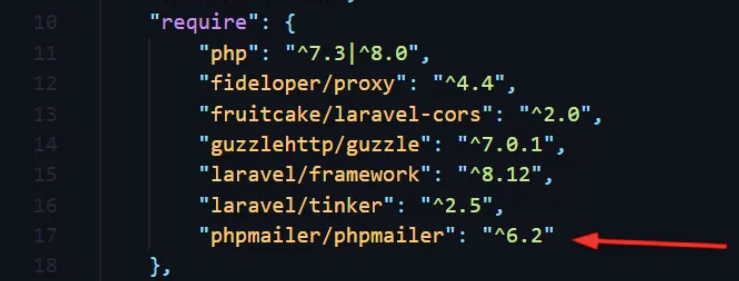
Let’s move to the next step, Now we will create a controller for sending emails. This controller file will contain the PHPMailer Script and will configure the SMTP setting.
Create PHPMailerController.php file
To create a controller file with the name PHPMailerController.php, Follow the below command.
|
2 3 4 |
php artisan make:controller PHPMailerController |
Use PHPMailer and Exceptional classes
Now at very first, Load the PHPMailer and Exception classes to configure the PHPMailer SMTP.
|
2 3 4 5 |
use PHPMailer\PHPMailer\PHPMailer; use PHPMailer\PHPMailer\Exception; |
Open the PHPMailerController.php file and simply paste the below code snippet.
|
2 3 4 5 6 7 8 9 10 11 12 13 14 15 16 17 18 19 20 21 22 23 24 25 26 27 28 29 30 31 32 33 34 35 36 37 38 39 40 41 42 43 44 45 46 47 48 49 50 51 52 53 54 55 56 57 58 59 60 61 62 63 64 65 66 67 68 69 70 71 |
<?php namespace App\Http\Controllers; use Illuminate\Http\Request; use PHPMailer\PHPMailer\PHPMailer; use PHPMailer\PHPMailer\Exception; class MailerController extends Controller { // =============== [ Email ] =================== public function email() { return view("email"); } // ========== [ Compose Email ] ================ public function composeEmail(Request $request) { require base_path("vendor/autoload.php"); $mail = new PHPMailer(true); // Passing `true` enables exceptions try { // Email server settings $mail->SMTPDebug = 0; $mail->isSMTP(); $mail->Host = 'smtp.example.com'; // smtp host $mail->SMTPAuth = true; $mail->Username = 'user@example.com'; // sender username $mail->Password = '**********'; // sender password $mail->SMTPSecure = 'tls'; // encryption - ssl/tls $mail->Port = 587; // port - 587/465 $mail->setFrom('sender@example.com', 'SenderName'); $mail->addAddress($request->emailRecipient); $mail->addCC($request->emailCc); $mail->addBCC($request->emailBcc); $mail->addReplyTo('sender@example.com', 'SenderReplyName'); if(isset($_FILES['emailAttachments'])) { for ($i=0; $i < count($_FILES['emailAttachments']['tmp_name']); $i++) { $mail->addAttachment($_FILES['emailAttachments']['tmp_name'][$i], $_FILES['emailAttachments']['name'][$i]); } } $mail->isHTML(true); // Set email content format to HTML $mail->Subject = $request->emailSubject; $mail->Body = $request->emailBody; // $mail->AltBody = plain text version of email body; if( !$mail->send() ) { return back()->with("failed", "Email not sent.")->withErrors($mail->ErrorInfo); } else { return back()->with("success", "Email has been sent."); } } catch (Exception $e) { return back()->with('error','Message could not be sent.'); } } } |
In the above code, You don’t forget to update the sender details like as username, password, sender email, sender name to send an email using your own credentials.
After placing the above snippets, you will require to create routes in the web.php file.
Create Routes For PHPMailer
Now, Add the below code to create routes into the web.php file. There are two routes defined here. The first route (Using GET Method) is used to load the view from where we will send the email. The second route (Using POST Method) is to compose an email.
|
2 3 4 5 6 7 8 9 10 11 |
<?php use App\Http\Controllers\PHPMailerController; use Illuminate\Support\Facades\Route; Route::get("email", [PHPMailerController::class, "email"])->name("email"); Route::post("send-email", [PHPMailerController::class, "composeEmail"])->name("send-email"); |
Create a View For Sending Email Using PHPMailer
Let’s create a view file with the name email.blade.php in the resources/views directory for sending a successful email. Now, you have to copy and paste the below code snippet for a basic HTML form design.
|
2 3 4 5 6 7 8 9 10 11 12 13 14 15 16 17 18 19 20 21 22 23 24 25 26 27 28 29 30 31 32 33 34 35 36 37 38 39 40 41 42 43 44 45 46 47 48 49 50 51 52 53 54 55 56 57 58 59 60 61 62 63 64 65 66 67 68 69 70 71 72 73 74 75 |
<!doctype html> <html lang="en"> <head> <title>Send Email Using PHPMailer in Laravel</title> <meta charset="utf-8"> <meta name="viewport" content="width=device-width, initial-scale=1, shrink-to-fit=no"> <link rel="stylesheet" href="https://maxcdn.bootstrapcdn.com/bootstrap/4.5.2/css/bootstrap.min.css"> </head> <body> <div class="container pt-5 pb-5"> <div class="row"> <div class="col-xl-6 col-lg-6 col-sm-12 col-12 m-auto"> <form action="{{route('send-email')}}" method="POST" enctype="multipart/form-data"> @csrf <div class="card shadow"> @if(Session::has("success")) <div class="alert alert-success alert-dismissible"><button type="button" class="close">×</button>{{Session::get('success')}}</div> @elseif(Session::has("failed")) <div class="alert alert-danger alert-dismissible"><button type="button" class="close">×</button>{{Session::get('failed')}}</div> @endif <div class="card-header"> <h4 class="card-title">Send Email Using PHPMailer</h4> </div> <div class="card-body"> <div class="form-group"> <label for="emailRecipient">Email To </label> <input type="email" name="emailRecipient" id="emailRecipient" class="form-control" placeholder="Mail To"> </div> <div class="form-group"> <label for="emailCc">CC </label> <input type="email" name="emailCc" id="emailCc" class="form-control" placeholder="Mail CC"> </div> <div class="form-group"> <label for="emailBcc">BCC </label> <input type="email" name="emailBcc" id="emailBcc" class="form-control" placeholder="Mail BCC"> </div> <div class="form-group"> <label for="emailSubject">Subject </label> <input type="text" name="emailSubject" id="emailSubject" class="form-control" placeholder="Mail Subject"> </div> <div class="form-group"> <label for="emailBody">Message </label> <textarea name="emailBody" id="emailBody" class="form-control" placeholder="Mail Body"></textarea> </div> <div class="form-group"> <label for="emailAttachments">Attachment(s) </label> <input type="file" name="emailAttachments[]" multiple="multiple" id="emailAttachments" class="form-control"> </div> </div> <div class="card-footer"> <button type="submit" class="btn btn-success">Send Email </button> </div> </div> </form> </div> </div> </div> <script src="https://ajax.googleapis.com/ajax/libs/jquery/3.5.1/jquery.min.js"></script> <script src="https://cdnjs.cloudflare.com/ajax/libs/popper.js/1.16.0/umd/popper.min.js"></script> <script src="https://maxcdn.bootstrapcdn.com/bootstrap/4.5.2/js/bootstrap.min.js"></script> </body> </html> |
Let’s, save the file email.blade.php. The above snippet will generate a form as showing below.
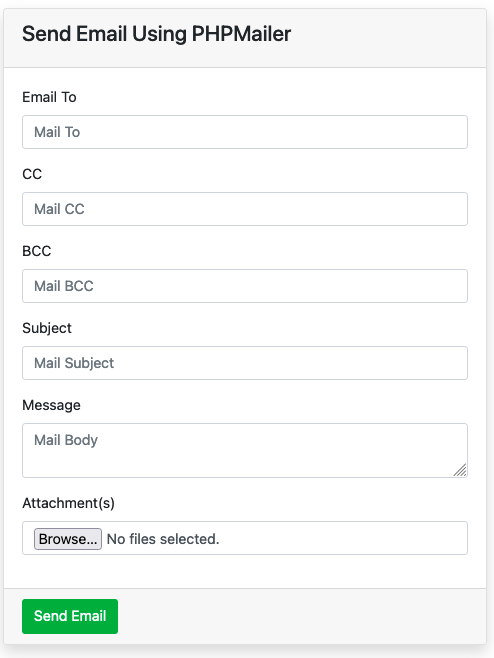
Here, in the above form, We have entered the email recipient, cc, bcc, subject, email body, and attachment.
After this, submit the send Email button. In the response, you will get a success message that email has been sent.
If you will use Gmail SMTP to send an email, you must first create an app password for your Gmail account and enable less secure app access.
Send email using Gmail SMTP server in Laravel
To use Gmail SMTP with the PHPMailer library in Laravel, you must be changed some settings in the Google account. Please follow the below steps.
- Step-1: Login to your Google account. Go to the My Account page
- Step-2: Navigate to the Security page and scroll down to the Signing into Google section » Turn Off the 2-Step Verification
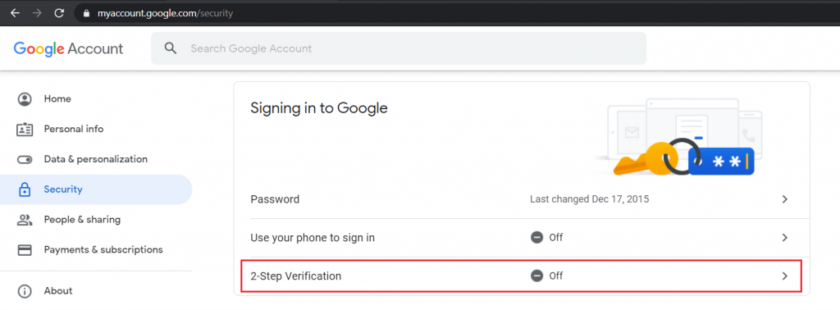
- Step-3: Scroll down the Less secure app access section and turn On Less secure app access.

Hey, You are done to use Gmail SMTP to send emails from the Laravel application.
Update your Gmail account credentials (email address and password) in the below code snippet
|
2 3 4 5 6 7 8 9 10 11 |
// SMTP configuration $mail->isSMTP(); $mail->Host = 'smtp.gmail.com'; $mail->SMTPAuth = true; $mail->Username = 'sender@gmail.com'; $mail->Password = '******'; $mail->SMTPSecure = 'tls'; $mail->Port = 587; |
Now you are ready to send email using Gmail SMTP in Laravel.

Conclusion
Well, In this article you will get the complete steps to Send an Email with an attachment using PHPMailer in Laravel. You can extend the functionality as per your requirement. I hope you found this tutorial helpful for your project. Keep learning!.
Having trouble? Are you want to get implementation help, or modify or extend the functionality of this script? Submit a paid service request

Pradeep Maurya is the Professional Web Developer & Designer and the Founder of “Tutorials website”. He lives in Delhi and loves to be a self-dependent person. As an owner, he is trying his best to improve this platform day by day. His passion, dedication and quick decision making ability to stand apart from others. He’s an avid blogger and writes on the publications like Dzone, e27.co


