If you want to integrate PhonePe payment gateway on your php laravel website/application, it’s not just about Laravel code. You need to get a merchant account for handling payments, grab some API credentials, and set up how the payment function works.
Let’s start php laravel PhonePe payment gateway Integration into your website/application.
Suggested Read: How to Integrate PhonePe Payment Gateway in PHP
There is no need to worry about creating an account for testing the PhonePe payment gateway – the test credentials are open to everyone. But when you’re ready to take the live / production keys for real payments, log in or register on PhonePe Business Solutions.
Suppose you already have a merchant account and API credentials for your PhonePe gateway.
PhonePe API Credentials
|
2 3 4 5 6 |
// Replace these with your actual PhonePe API credentials $apiKey = 'YOUR_API_KEY'; $merchantId = 'YOUR_MERCHANT_ID'; |
Test Credentials :
Merchant ID : PGTESTPAYUAT
Salt Key: 099eb0cd-02cf-4e2a-8aca-3e6c6aff0399
Test Card Details:
Card: 4242 4242 4242 4242
Expiry: 12/25 (any future date)
CVV: 357
OTP: 987654
Are you want to get implementation help, or modify or extend the functionality?
A Tutorialswebsite Expert can do it for you.
Step 1: Create a controller
|
2 3 4 |
php artisan make:controller PaymentController |
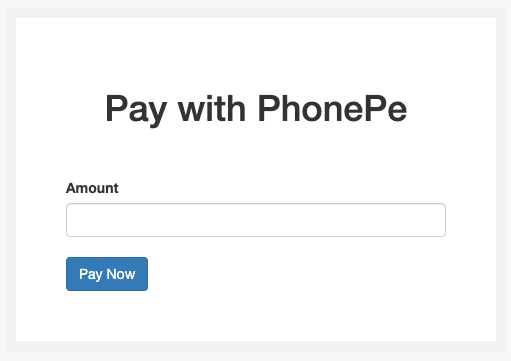
Step 2: Let’s Build Your Payment Form
Next up, we’re going to create a user-friendly payment form. This form will enable you to request the necessary details and receive the confirmation. Let’s get started!
Now create a payment form at the location: resources/views/payment-form.blade.php
Copy and Paste the below code on the above file.
|
2 3 4 5 6 7 8 9 10 11 12 13 14 15 16 17 18 19 20 21 22 23 24 25 26 27 28 29 30 |
<!DOCTYPE html> <html lang="en"> <head> <meta charset="utf-8"> <meta name="viewport" content="width=device-width, initial-scale=1"> <title>PhonePe Payment Gateway Integration in Laravel</title> <!-- BOOTSTRAP --> <link href="https://maxcdn.bootstrapcdn.com/bootstrap/3.3.6/css/bootstrap.min.css" rel="stylesheet" /> </head> <body> <div class="form-box"> <h4>Pay with PhonePe</h4> <form action="{{ route('pay-now') }}" method="post" style="margin-top: 50px;"> @csrf <div class="formgroup"> <label>Amount</label> <input type="number" name="amount" placeholder="Amount" class="form-control"> </div> <button type="submit" class="btn btn-primary">Pay Now</button> </form> </div> </body> </html> |
Step 3: Create Routes in web.php
Let’s create 3 routes in your web.php file. The 1st route will load a Phonepe request, 2nd route will handle the submitted payment form request, 3rd route will handle the response from the Phonepe server in the form of a “SUCCESS” response or “FAILED” response.
|
2 3 4 5 6 7 8 9 10 11 |
//PAYMENT FORM Route::get('payment', [\App\Http\Controllers\PaymentController::class, 'index'])->name('payment'); //SUBMIT PAYMENT FORM ROUTE Route::post('pay-now', [\App\Http\Controllers\PaymentController::class, 'submitPaymentForm'])->name('pay-now'); //CALLBACK ROUTE Route::get('confirm', [\App\Http\Controllers\PaymentController::class, 'confirmPayment'])->name('confirm'); |
Step 4: Create a Model to Insert Data into a Table
To insert data into a table in Laravel, If you don’t already have a model for your table, you can create one using the following command:
|
2 3 4 5 6 |
php artisan make:model Payment //Replace "Payment" with the name you want for your model. |
Open the generated model file (located in the app directory) and define the model class and the associated table name:
|
2 3 4 5 6 7 8 9 10 11 12 13 14 |
// app/Payment.php namespace App; use Illuminate\Database\Eloquent\Model; class Payment extends Model { protected $table = 'your_table_name'; // other model configurations... } |
Step 5: Create a Payment Function
Now create a function named index in PaymentController.php
|
2 3 4 5 6 7 8 9 10 11 12 13 14 15 16 17 18 19 |
namespace App\Http\Controllers; use Illuminate\Http\Request; use Illuminate\Support\Facades\Redirect; class PaymentController extends Controller { public function index() { return view('payment-form'); } } |
Now create a function named submitPaymentForm in PaymentController.php
|
2 3 4 5 6 7 8 9 10 11 12 13 14 15 16 17 18 19 20 21 22 23 24 25 26 27 28 29 30 31 32 33 34 35 36 37 38 39 40 41 42 43 44 45 46 47 48 49 50 51 52 53 54 55 56 57 58 59 60 61 62 63 64 65 66 67 68 69 70 71 72 73 74 75 76 77 78 79 80 81 82 83 84 85 86 87 88 89 90 91 92 93 94 95 96 97 98 99 100 101 102 103 104 105 106 107 108 109 110 111 112 113 114 115 116 117 118 119 120 121 122 123 |
namespace App\Http\Controllers; use Illuminate\Http\Request; use Illuminate\Support\Facades\Redirect; class PaymentController extends Controller { public function index() { return view('payment-form'); } public function submitPaymentForm(Request $request) { $request->validate([ 'amount'=>'required' ],[ 'amount'=>'Amount is Required' ]); $amount = $request->input('amount'); if($name !='' && $amount !=''){ $merchantId = 'PGTESTPAYUAT'; $apiKey = '099eb0cd-02cf-4e2a-8aca-3e6c6aff0399'; $redirectUrl = route('confirm'); $order_id = uniqid(); $transaction_data = array( 'merchantId' => "$merchantId", 'merchantTransactionId' => "$order_id", "merchantUserId"=>$order_id, 'amount' => $amount*100, 'redirectUrl'=>"$redirectUrl", 'redirectMode'=>"POST", 'callbackUrl'=>"$redirectUrl", "paymentInstrument"=> array( "type"=> "PAY_PAGE", ) ); $encode = json_encode($transaction_data); $payloadMain = base64_encode($encode); $salt_index = 1; //key index 1 $payload = $payloadMain . "/pg/v1/pay" . $apiKey; $sha256 = hash("sha256", $payload); $final_x_header = $sha256 . '###' . $salt_index; $request = json_encode(array('request'=>$payloadMain)); $curl = curl_init(); curl_setopt_array($curl, [ CURLOPT_URL => "https://api-preprod.phonepe.com/apis/pg-sandbox/pg/v1/pay", CURLOPT_RETURNTRANSFER => true, CURLOPT_ENCODING => "", CURLOPT_MAXREDIRS => 10, CURLOPT_TIMEOUT => 30, CURLOPT_HTTP_VERSION => CURL_HTTP_VERSION_1_1, CURLOPT_CUSTOMREQUEST => "POST", CURLOPT_POSTFIELDS => $request, CURLOPT_HTTPHEADER => [ "Content-Type: application/json", "X-VERIFY: " . $final_x_header, "accept: application/json" ], ]); $response = curl_exec($curl); $err = curl_error($curl); curl_close($curl); if ($err) { echo "cURL Error #:" . $err; } else { $res = json_decode($response); // Store information into database $data = [ 'amount' => $amount, 'transaction_id' => $order_id, 'payment_status' => 'PAYMENT_PENDING', 'response_msg'=>$response, 'providerReferenceId'=>'', 'merchantOrderId'=>'', 'checksum'=>'' ]; Payment::create($data); // end database insert if(isset($res->code) && ($res->code=='PAYMENT_INITIATED')){ $payUrl=$res->data->instrumentResponse->redirectInfo->url; return redirect()->away($payUrl); }else{ //HANDLE YOUR ERROR MESSAGE HERE dd('ERROR : ' . $res); } } } } } |
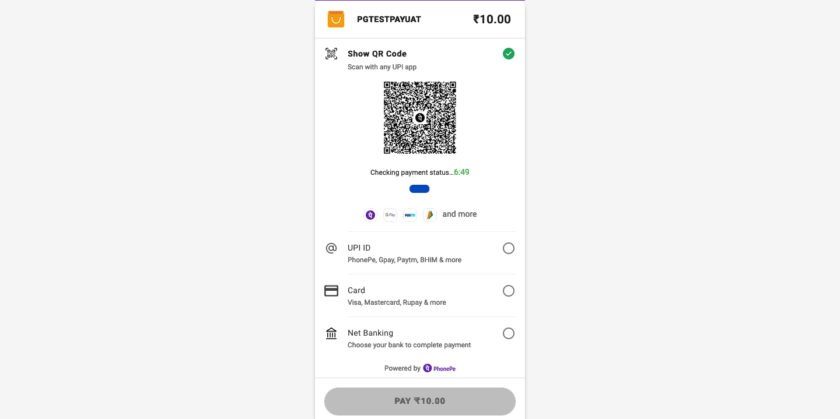
PhonePe Checkout Page
Step 6: Setting Up the Callback Function
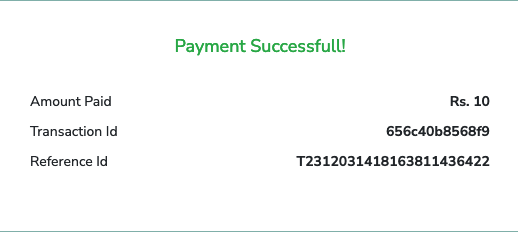
Now, let’s make a function called “confirmPayment” in PaymentController.php. In this function, we’ll handle and receive PhonePe transaction details like code, merchantId, transactionId, amount, providerReferenceId, checksum, and more.
Note: You will receive transaction data using the POST method.
|
2 3 4 5 6 7 8 9 10 11 12 13 14 15 16 17 18 19 20 21 22 23 24 25 26 27 28 29 30 31 32 33 34 35 36 37 38 |
public function confirmPayment(Request $request) { if($request->code == 'PAYMENT_SUCCESS') { $transactionId = $request->transactionId; $merchantId=$request->merchantId; $providerReferenceId=$request->providerReferenceId; $merchantOrderId=$request->merchantOrderId; $checksum=$request->checksum; $status=$request->code; //Transaction completed, You can add transaction details into database $data = [ 'providerReferenceId' => $providerReferenceId, 'checksum' => $checksum, ]; if($merchantOrderId !=''){ $data['merchantOrderId']=$merchantOrderId; } Payment::where('transaction_id', $transactionId)->update($data); return view('confirm_payment',compact('providerReferenceId', 'transactionId')); }else{ //HANDLE YOUR ERROR MESSAGE HERE dd('ERROR : ' .$request->code. ', Please Try Again Later.'); } } |
Now create a response view page at the location: resources/views/confirm_payment.blade.php and and display providerReferenceId and transactionId.
Step 7: Exclude callback URL
As PhonePe’s payment callback works with the POST method and doesn’t include a CSRF token from their side. So we need to exclude CSRF verification for the PhonePe callback URL.
To achieve this, add the callback URL to a middleware located in app/Http/Middleware/VerifyCsrfToken.php.
|
2 3 4 5 6 7 8 9 10 11 12 13 14 15 |
<?php namespace App\Http\Middleware; use Illuminate\Foundation\Http\Middleware\VerifyCsrfToken as Middleware; class VerifyCsrfToken extends Middleware { protected $except = [ 'confirm' ]; } |
It’s done, Now you can make the payment in test mode. http://yourdomain.com/payment/
Note: Please replace ‘YOUR_API_KEY’, ‘YOUR_MERCHANT_ID’, ‘YOUR_ORDER_ID’, ‘YOUR_REDIRECT_URL’, and other placeholders with your actual credentials and data.
👍
UAT OR SANDBOX API
UAT Host URL: https://api-preprod.phonepe.com/apis/pg-sandbox
API End Point: /pg/v1/payUAT PAY API URL: https://api-preprod.phonepe.com/apis/pg-sandbox/pg/v1/pay
Are you want to get implementation help, or modify or extend the functionality?
A Tutorialswebsite Expert can do it for you.
Wrapping Words
These are the simple and easy steps to Integrate PhonePe Payment Gateway in PHP. You can modify and customize code as per your requirements.
Do you want to get implementation help, or modify or extend the functionality of this script? Submit a paid service request
Related Article
Integrate Recurring Stripe Subscription Payment with PHP
Integrate Blockonomics bitcoin payment gateway in PHP
FAQs
You will get test/sandbox API details from this link: https://developer.phonepe.com/v1/docs/uat-testing
Test Credentials :
Merchant ID : PGTESTPAYUAT
Salt Key: 099eb0cd-02cf-4e2a-8aca-3e6c6aff0399
Test Card Details:
Card: 4242 4242 4242 4242
Expiry: 12/25 (any future date)
CVV: 357
OTP: 987654
Yes, You can integrate PhonePe Payment Gateway API In PHP. Please follow this link
You just need to call or Whatsapp at: +91-8218920611
You will receive an email with live Salt Key and Salt Index from the PhonePe PG team. When your account is verified and activated to accept online payment.

Pradeep Maurya is the Professional Web Developer & Designer and the Founder of “Tutorials website”. He lives in Delhi and loves to be a self-dependent person. As an owner, he is trying his best to improve this platform day by day. His passion, dedication and quick decision making ability to stand apart from others. He’s an avid blogger and writes on the publications like Dzone, e27.co




[…] PhonePe Payment Gateway Integration in Laravel […]
[…] Suggested Read: How to Integrate PhonePe Payment Gateway in Laravel […]