It’s common to Upload a video file using HTML form. But, uploading a video with Progress Bar is the most important feature of the dynamic web application. The video file upload functionality can be easily implemented using PHP. When you use PHP to upload a file, the page is usually refreshed. But, javaScript and Ajax can be used to upload video or images without refreshing the page.
The Progress Bar is highly useful for showing the upload progress in a human-readable format. A progress bar is a graphical feature that captures the status of an operation. A progress bar is typically used to view a percentage representation of progress for upload, download, or installation. This tutorial will clearly show How to upload video with a progress bar in PHP.
Suggested Read: Convert File Size to Human Readable Format in PHP
Uploading video with a progress bar
First we will create a HTML form to upload video with progress bar functionality.
Create index.php file
In this form, we have file input and progress bar to show the progress of the upload file.
|
2 3 4 5 6 7 8 9 10 11 12 13 14 15 16 17 18 19 20 21 22 23 24 25 26 27 28 29 30 31 32 33 34 35 36 37 38 39 40 |
<!DOCTYPE html> <html lang="en"> <head> <title>Uploading video with a progress bar</title> <meta http-equiv="Content-Type" content="text/html; charset=UTF-8"/> <meta name='viewport' content='width=device-width, initial-scale=1'> </head> <body> <div class="container"> <div class="row text-center"> <div class="col-2"></div> <div class="col-8"> <form id="upload_form" enctype="multipart/form-data" method="post"> <div class="form-group"> <input type="file" name="uploadingfile" id="uploadingfile"> </div> <div class="form-group"> <input class="btn btn-primary" type="button" value="Upload File" name="btnSubmit" onclick="uploadFileHandler()"> </div> <div class="form-group"> <div class="progress" id="progressDiv" style="display:none;"> <progress id="progressBar" value="0" max="100" style="width:100%; height: 1.2rem;"></progress> </div> </div> <div class="form-group"> <h3 id="status"></h3> <p id="uploaded_progress"></p> </div> </form> </div> <div class="col-2"></div> </div> </div> </body> </html> |
Add Ajax JavaScript which handles “real time” progress
The following javaScript code sends data from the selected file to the server-side script without reloading the page.
|
2 3 4 5 6 7 8 9 10 11 12 13 14 15 16 17 18 19 20 21 22 23 24 25 26 27 28 29 30 31 32 33 34 35 36 37 38 39 40 |
<script> function _(abc) { return document.getElementById(abc); } function uploadFileHandler() { document.getElementById('progressDiv').style.display='block'; var file = _("uploadingfile").files[0]; var formdata = new FormData(); formdata.append("uploadingfile", file); var ajax = new XMLHttpRequest(); ajax.upload.addEventListener("progress", progressHandler, false); ajax.addEventListener("load", completeHandler, false); ajax.addEventListener("error", errorHandler, false); ajax.addEventListener("abort", abortHandler, false); ajax.open("POST", "upload.php"); ajax.send(formdata); } function progressHandler(event) { var loaded = new Number((event.loaded / 1048576));//Make loaded a "number" and divide bytes to get Megabytes var total = new Number((event.total / 1048576));//Make total file size a "number" and divide bytes to get Megabytes _("uploaded_progress").innerHTML = "Uploaded " + loaded.toPrecision(5) + " Megabytes of " + total.toPrecision(5);//String output var percent = (event.loaded / event.total) * 100;//Get percentage of upload progress _("progressBar").value = Math.round(percent);//Round value to solid _("status").innerHTML = Math.round(percent) + "% uploaded";//String output } function completeHandler(event) { _("status").innerHTML = event.target.responseText;//Build and show response text _("progressBar").value = 0;//Set progress bar to 0 document.getElementById('progressDiv').style.display = 'none';//Hide progress bar } function errorHandler(event) { _("status").innerHTML = "Upload Failed";//Switch status to upload failed } function abortHandler(event) { _("status").innerHTML = "Upload Aborted";//Switch status to aborted } </script> |
Create upload.php file to handle video upload using AJAX
The upload.php file is called to handle the process of uploading the file with PHP by the Ajax request.
So now we will also create “uploads” folder under current working directory to upload the files.
|
2 3 4 5 6 7 8 9 10 11 12 13 14 15 16 17 18 19 20 21 22 23 24 25 26 27 28 29 30 31 |
<?php if (!$_FILES["uploadingfile"]["tmp_name"]) {//No file chosen echo "ERROR: Please browse for a file before clicking the upload button."; exit(); } else { $extension = pathinfo($_FILES['uploadingfile']['name'], PATHINFO_EXTENSION); if ((($_FILES["uploadingfile"]["type"] == "video/mp4")) && $extension == 'mp4') { //Directory to put file into $folderPath = "uploads/"; //File name $original_file_name = $_FILES["uploadingfile"]["name"]; $size_raw = $_FILES["uploadingfile"]["size"];//File size in bytes $size_as_mb = number_format(($size_raw / 1048576), 2);//Convert bytes to Megabytes if (move_uploaded_file($_FILES["uploadingfile"]["tmp_name"], "$folderPath" . $_FILES["uploadingfile"]["name"] . "")) { //Move file echo "$original_file_name upload is complete"; } } else { echo "File is not a MP4"; exit; } } |
Note: Make sure you have an uploads folder,
Now we will add some CSS style to make form presentable
|
2 3 4 5 6 7 8 9 10 11 12 13 14 15 16 17 18 19 20 21 22 23 24 25 26 27 28 29 30 31 32 33 34 35 36 37 38 39 40 41 42 43 44 45 46 47 48 49 50 51 52 53 54 55 56 57 58 59 60 61 62 63 64 65 66 67 68 69 70 71 72 73 74 |
<style> form { margin: 5% auto; border-radius: .3rem; padding: 1.3rem; border: #2274ac40 1px solid; width:30%; text-align:center; } input { width: 90%; border: 0; padding: 20px; border-radius: 6px; margin-bottom: 10px; border: 1px solid #839af5; } .btn { width: 100%; padding: .5rem; border: 0; background: #fe6f27; font-size: 1.2em; color: #fff; text-shadow: 1px 1px 0px rgba(0, 0, 0, .4); box-shadow: 0px 3px 0px #fe6f27; margin-top: 1.2rem; } .btn:hover { background: #00398c; color: #b5b5b5; box-shadow: none; } .form-control { display: block; width: 100%; height: calc(1.5em + .75rem + 2px); padding: .375rem .75rem; font-size: 1rem; font-weight: 400; line-height: 1.5; color: #d6d8db; background-color: #3c4760; background-clip: padding-box; border: 1px solid #72a7db; border-radius: .25rem; transition: border-color .15s ease-in-out, box-shadow .15s ease-in-out; } .progress { background-color: #3fee8c; position: relative; margin: 20px; height: 1.2rem; } .progress-bar { background-color: #7eeed8; width: 100%; height: 1.2rem; } progress::-webkit-progress-value { background: #3fee8c; } progress::-webkit-progress-bar { background: #1e1e3c; } progress::-moz-progress-bar { background: #3fee8c; } </style> |
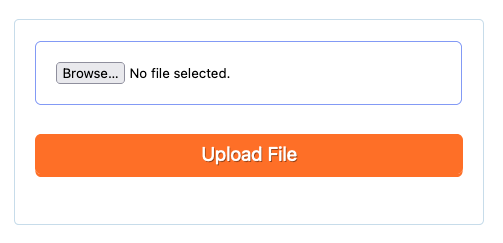
After adding above CSS your form will look like below screenshot.

Complete code
Use the below complete code to upload a video file with a progress bar using PHP and JavaScript.
|
2 3 4 5 6 7 8 9 10 11 12 13 14 15 16 17 18 19 20 21 22 23 24 25 26 27 28 29 30 31 32 33 34 35 36 37 38 39 40 41 42 43 44 45 46 47 48 49 50 51 52 53 54 55 56 57 58 59 60 61 62 63 64 65 66 67 68 69 70 71 72 73 74 75 76 77 78 79 80 81 82 83 84 85 86 87 88 89 90 91 92 93 94 95 96 97 98 99 100 101 102 103 104 105 106 107 108 109 110 111 112 113 114 115 116 117 118 119 120 121 122 123 124 125 126 127 128 129 130 131 132 133 134 135 136 137 138 139 140 141 142 143 144 145 146 147 |
<!DOCTYPE html> <html lang="en"> <head> <title>Uploading video with a progress bar</title> <meta http-equiv="Content-Type" content="text/html; charset=UTF-8"/> <meta name='viewport' content='width=device-width, initial-scale=1'> <style> form { margin: 5% auto; border-radius: .3rem; padding: 1.3rem; border: #2274ac40 1px solid; width:30%; text-align:center; } input { width: 90%; border: 0; padding: 20px; border-radius: 6px; margin-bottom: 10px; border: 1px solid #839af5; } .btn { width: 100%; padding: .5rem; border: 0; background: #fe6f27; font-size: 1.2em; color: #fff; text-shadow: 1px 1px 0px rgba(0, 0, 0, .4); box-shadow: 0px 3px 0px #fe6f27; margin-top: 1.2rem; } .btn:hover { background: #00398c; color: #b5b5b5; box-shadow: none; } .form-control { display: block; width: 100%; height: calc(1.5em + .75rem + 2px); padding: .375rem .75rem; font-size: 1rem; font-weight: 400; line-height: 1.5; color: #d6d8db; background-color: #3c4760; background-clip: padding-box; border: 1px solid #72a7db; border-radius: .25rem; transition: border-color .15s ease-in-out, box-shadow .15s ease-in-out; } .progress { background-color: #3fee8c; position: relative; margin: 20px; height: 1.2rem; } .progress-bar { background-color: #7eeed8; width: 100%; height: 1.2rem; } progress::-webkit-progress-value { background: #3fee8c; } progress::-webkit-progress-bar { background: #1e1e3c; } progress::-moz-progress-bar { background: #3fee8c; } </style> </head> <body> <div class="container"> <div class="row text-center"> <div class="col-2"></div> <div class="col-8"> <form id="upload_form" enctype="multipart/form-data" method="post"> <div class="form-group"> <input type="file" name="uploadingfile" id="uploadingfile"> </div> <div class="form-group"> <input class="btn btn-primary" type="button" value="Upload File" name="btnSubmit" onclick="uploadFileHandler()"> </div> <div class="form-group"> <div class="progress" id="progressDiv" style="display:none;"> <progress id="progressBar" value="0" max="100" style="width:100%; height: 1.2rem;"></progress> </div> </div> <div class="form-group"> <h3 id="status"></h3> <p id="uploaded_progress"></p> </div> </form> </div> <div class="col-2"></div> </div> </div> <script> function _(abc) { return document.getElementById(abc); } function uploadFileHandler() { document.getElementById('progressDiv').style.display='block'; var file = _("uploadingfile").files[0]; var formdata = new FormData(); formdata.append("uploadingfile", file); var ajax = new XMLHttpRequest(); ajax.upload.addEventListener("progress", progressHandler, false); ajax.addEventListener("load", completeHandler, false); ajax.addEventListener("error", errorHandler, false); ajax.addEventListener("abort", abortHandler, false); ajax.open("POST", "upload.php"); ajax.send(formdata); } function progressHandler(event) { var loaded = new Number((event.loaded / 1048576));//Make loaded a "number" and divide bytes to get Megabytes var total = new Number((event.total / 1048576));//Make total file size a "number" and divide bytes to get Megabytes _("uploaded_progress").innerHTML = "Uploaded " + loaded.toPrecision(5) + " Megabytes of " + total.toPrecision(5);//String output var percent = (event.loaded / event.total) * 100;//Get percentage of upload progress _("progressBar").value = Math.round(percent);//Round value to solid _("status").innerHTML = Math.round(percent) + "% uploaded";//String output } function completeHandler(event) { _("status").innerHTML = event.target.responseText;//Build and show response text _("progressBar").value = 0;//Set progress bar to 0 document.getElementById('progressDiv').style.display = 'none';//Hide progress bar } function errorHandler(event) { _("status").innerHTML = "Upload Failed";//Switch status to upload failed } function abortHandler(event) { _("status").innerHTML = "Upload Aborted";//Switch status to aborted } </script> </body> </html> |
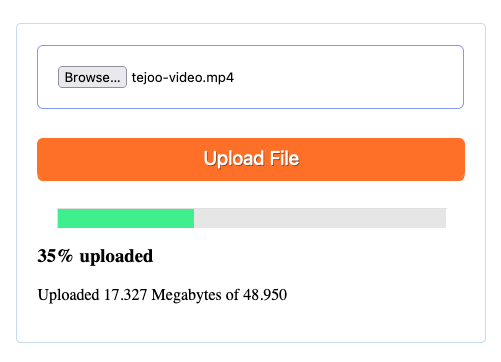
It’s done. Now just open your index.php file in your browser and upload the video file. You will get below screenshot on uploading video with a progress bar.

Are you want to get implementation help, or modify or extend the functionality?
A Tutorialswebsite Expert can do it for you.
Wrapping Words!
Thanks for reading 🙏, I hope you found How to upload video with a progress bar in PHP tutorial helpful for your project. Keep learning!. If you face any problem – I am here to solve your problems.
Also Read: jQuery to Preview and Rotate an Image Before Upload using PHP

Pradeep Maurya is the Professional Web Developer & Designer and the Founder of “Tutorials website”. He lives in Delhi and loves to be a self-dependent person. As an owner, he is trying his best to improve this platform day by day. His passion, dedication and quick decision making ability to stand apart from others. He’s an avid blogger and writes on the publications like Dzone, e27.co


